Configuring a key management system
Introduction
Lately, I have been curious about how key management systems (KMS) work, so I thought the best way to learn how they work is to implement one myself! I decided to use Vault, created by HashiCorp, because it was free to download and had the most recommendations that I saw when searching for software to use. My main goal for this project is to implement a simple Python program which allows users to retrieve their API keys by querying a Vault instance on a separate server. This should provide a sufficient idea about how the key management systems are supposed to work and how to interact with them. I plan to utilise what I learn here on future projects such as encrypting databases, but that project is for another time!
The Vault will be installed on a virtual Ubuntu server, and I will interact with it using a virtual Kali Linux machine. I configured these virtual machines to communicate on the same network utilising the same process I explained the last post.
Gaining a basic understanding
Before I can outline and specify the specific requirements of this project, I first need to gain a basic understanding of how the Vault works. I did this by following the basic Vault CLI tutorial, and the end result was a production-ready server (kind of). I was also introduced to a web UI interface which I will also be utilising to create the server.
To summarise how the Vault works, when it starts, it utilises Shamir’s Secret Sharing algorithm to ask for a specified number of keys. The owners of these keys will then have to input a minimum number of them in order to decrypt the Vault. These keys are generated when the Vault is created, and each key can be encrypted with each owner’s GPG key, meaning only the owner can decrypt the encrypted key into the clear text key needed to decrypt the Vault. Once the Vault is decrypted, a user must authenticate themselves (in my case with a token) before they can access the secrets contained within.
Requirements
As stated before, I want to create a basic Python program which queries the key manager for API keys. Some additional requirements about the project can be seen below:
- Communication between Python and the Vault must be encrypted with TLS
- The program must allow the user to input a username to query for the API key (the secret) that they want to access. There will be 3 secrets / API keys - configured in the Vault, but the encryptor will only be allowed to access 2 of them. The 3rd must be blocked from being accessed (to simulate access permissions)
- The program will authenticate itself via token authentication (the token used should not be the root token)
- This has to be done on a production deployment
- The token that the Python program uses should be renewed every time the program is started
Adding a TLS certificate
My initial approach to adding this certificate was to grab one from Let’s Encrypt using Certbot, but this required having a domain name and agreeing to some TOS (which I couldn’t be bothered to read) and also was a bit overkill for the purposes of this project. Therefore, I opted for a self-signed certificate, which would provide encryption when communicating with the Vault (although authentication of the legitimacy of the certificate certainly went out of the window here).
I created the certificate and the private key by running the command:
openssl req -nodes -x509 -days 365 -keyout domain.key -out domain.crt -config cert.conf
I then had to tell Vault where these were and also enable TLS in the config file, which can be seen below:
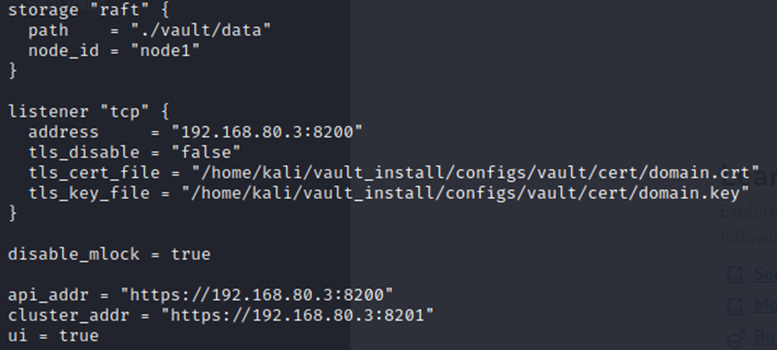
This successfully enables encryption when communicating with the server and achieves the first requirement.
However, then I discovered that Vault CLI does not want to communicate if the TLS certificate is self-signed (at least with my configuration). This caused some headaches until the -tls-skip-verify tag was discovered, which solved the issue.
A note from the future: If you happen to be following through this post, you should set the environment variable VAULT_SKIP_VERIFY to true in order to save some headache and command inputs down the line.
Creating the secrets, authentication and policies
Now I must properly configure the Vault. This involves generating some key shares, which can be done using the following command:
vault operator init -key-shares 3 -key-threshold 3
This generates 3 key shares where all 3 keys are needed in order to decrypt the database.
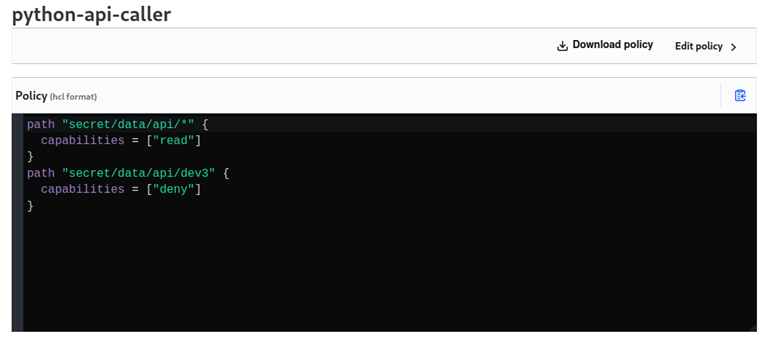
Now, I need to implement an access control policy (ACL) which will handle the permissions of the Python program. The created ACL can be seen below. This policy allows the program to access the api key of dev1 and dev2 but will disallow access to dev3 as per the requirements. It also only provides read permissions for these keys.
Now I need to create another access token for the Python program which has this policy attached to it. I can create a token by running the following command below:
vault token create -policy=python-api-caller -display-name="python-api-token" -period=768h -tls-skip-verify
The command above creates a new token with the policy I created. The period tag ensures that the token is valid indefinitely as long as it is renewed by the application within 30 days of its last renewal (which should be a sufficient amount of time for this project). I saved the outputted token to a file to be used later for the Python program.
The final thing left to configure is the secret API tokens that the Python program needs to access. I will create the API tokens: “api-token-1”, “api-token-2” and “api-token-3” for users dev1, dev2 and dev3 respectively. But first, I have to enable a secret engine for the path I need to use:
vault secrets enable -tls-skip-verify -path="secret" kv-v2
This now allows me to create secret tokens at the path /secret. Now I need to create 3 secrets on this new path, and I will do this via the CLI:
vault kv put -mount=secret api/dev1 api_token="api-token-1"
vault kv put -mount=secret api/dev2 api_token="api-token-2"
vault kv put -mount=secret api/dev3 api_token="api-token-3"
Now that the secrets have been added, the key management service is fully configured. The Python program can now be made to interact with the service. Creating the python program
To create the program, I first need to import the Vault Python library. Following this, I can now create a basic program which can be seen below:
1
2
3
4
5
6
7
8
9
10
11
12
13
14
15
16
17
18
import hvac

client = hvac.Client(url="https://<server_ip>:8200", verify=False) # connects to Vault and doesn't check the TLS certificate
client.token = "<client_token>" # sets the token for the session
client.auth.token.renew_self() # renews the session token

while True:
    try:
        user = input("Which user's API key do you want to access: ")
        if user == "q":
            exit()
        read_response = client.secrets.kv.v2.read_secret_version(mount_point="secret", path=f"api/{user}") # reads the secrets from the requested dev
        api_key = read_response["data"]["data"]["api_token"] # gets the api token from the request
        print(f"The API key for {user} is {api_key}")
    except hvac.exceptions.Forbidden:
        print("You do not have the permissions to view this!")
    except hvac.exceptions.InvalidPath:
        print("That user does not exist!")
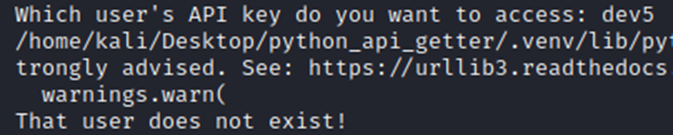
It is important to stress that this Python program isn’t very secure for many reasons, such as allowing the user to input any path that they like into the request on line 12 and being overly verbose (requesting a dev that doesn’t exist returns a different message to requesting dev3) but this is sufficient for the purposes of this project.
Testing
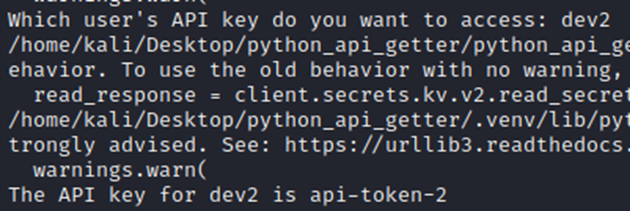
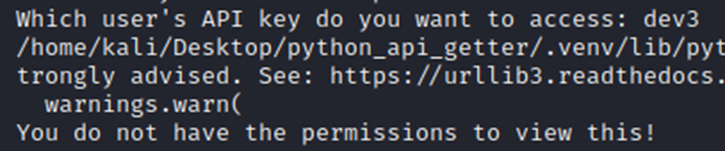
Below, you can see that requesting dev1 and dev2 returns their API keys, but requesting dev3 returns an error. Requesting any other dev also returns an error (as they do not exist). Please ignore the error message between the top and bottom lines; this is warning me that the TLS certificate being used is not validated by a CA (this really has been a nuisance during this project).
Conclusion
This project has been quite fun, and I have learnt a lot! My next project idea involves databases so maybe I can utilise a KMS during that.
References
Below are some resources that I used for this project: