Part 1: Configuring Kubernetes with Vault and MongoDB
Prerequisites
This setup uses Minikube to virtualise a Kubernetes cluster. Minikube is running on a virtual machie using Linux Alpine OS to reduce RAM usage. Additional packages were required (such as docker), but this will not be covered here. It should be noted that Minikube was compiled from source as there is not a particuarly clean way of installing an up-to-date version of it in Alpine (the current package is outdated).
Some additional configuration beyond installing packages was required, which is detailed below.
Enable Br_netfilter
Br_netfilter needs to be enabled to enable bridging on the OS. This is primarily required to allow Kubernetes pods to communicate with other pods using the Kubernetes DNS service. The command to do this is displayed below. The last line confirms that it has been enabled (it would display nothing if disabled).
1
2
3
modprobe br_netfilter
echo "br_netfilter" >> /etc/modules
lsmod | grep br_netfilter
Create offline root CA
An offline root CA is required to sign the Vault intermediate certificate, which will be used to sign certificates for other services on Kubernetes. For this offline root certificate, elliptical curves were chosen due to its smaller key size compared to RSA as specified by NIST. P-521 is generally not accepted in browsers, hence why P-256 was chosen. The command to generate it are detailed below.
openssl genpkey -genparam -algorithm EC -pkeyopt ec_paramgen_curve:P-256 -out ec_parameters
The root certificate and private key are created, which are both valid for 10 years (this is acceptable for a root CA):
openssl req -newkey ec:ec_parameters -noenc -x509 -days 3650 -keyout ca-key.pem -out ca-cert.pem
Generate Vault TLS certificates
The actual connections to Vault need to be encrypted to ensure all transmitted secrets/certificates cannot be intercepted in a man-in-the-middle attack. A seperate TLS certificate is created for this purpose. A certificate signing request is created to do this:
openssl req -newkey ec:ec_parameters -out vault-tls-request.csr -keyout vault-tls-key.pem -config vault-tls-config.conf -noenc
The configuration file is found below. The main thing to note is the DNS names which correspond to various Vault services running under the Vault namespace (which is where Vault is running).
[req]
prompt = no
distinguished_name = kubelet_serving
req_extensions = v3_req
[ kubelet_serving ]
O = system:nodes
CN = system:node:*.vault.svc.cluster.local
[ v3_req ]
basicConstraints = CA:FALSE
keyUsage = digitalSignature, keyEncipherment
extendedKeyUsage = serverAuth
subjectAltName = @alt_names
[alt_names]
DNS.1 = *.vault-internal
DNS.2 = *.vault-internal.vault.svc.cluster.local
DNS.3 = *.vault
IP.1 = 127.0.0.1
This request is then signed using the root CA and is made valid for 3 years. The copy extensions flag is important as it ensures the certificate signing request above is followed.
openssl x509 -req -in vault-tls-request.csr -CA ca-cert.pem -CAkey ca-key.pem -CAcreateserial -out vault-tls-cert.pem -days 1095 -copy_extensions copyall
This TLS certificate is then combined with the root certificate to form a chain of verification:
cat vault-tls-cert.pem ca-cert.pem > vault-tls-bundle.pem
Some secrets are created within Kubernetes to provide Vault with the certificates created above:
kubectl create secret generic vault-ca -n vault --from-file=vault.ca=ca-cert.pem
kubectl create secret tls vault-tls -n vault --cert vault-tls-bundle.pem --key vault-tls-key.pem
Configure Helm chart for Vault
Helm will be utilised to install Vault. The configuration below utilises the secrets above to start Vault. The configuration can be applied by running the following:
helm install -n vault vault hashicorp/vault -f helm-config.yaml
The contents of the helm-config.yaml are provided below:
global:
  enabled: true
  namespace: "vault"
  tlsDisable: false

server:
  enabled: true
  image:
    # Set image details to control version upgrades
    repository: "hashicorp/vault"
    tag: "2.0.4"
  logLevel: "info"
  logFormat: "json"
  resources:
    requests:
      memory: 2Gi
      cpu: 2000m
    limits:
      memory: 4Gi
      cpu: 2000m
  extraEnvironmentVars:
    # Used to verify the CA certificate when using the command line
    VAULT_CACERT: /vault/userconfig/vault-ca/vault.ca
  volumes:
    # Attaches the Root CA certificate
    - name: userconfig-vault-ca
      secret:
        defaultMode: 420
        secretName: vault-ca
    # Attaches the Vault TLS certificate and private key
    - name: userconfig-vault-tls
      secret:
        defaultMode: 420
        secretName: vault-tls
  # Mounts the volumes above
  volumeMounts:
    - mountPath: /vault/userconfig/vault-ca
      name: userconfig-vault-ca
      readOnly: true
    - mountPath: /vault/userconfig/vault-tls
      name: userconfig-vault-tls
      readOnly: true
  standalone:
    enabled: false
  ha:
    enabled: true
    replicas: 1 # Increasing this requires the 'raft' storage config to be further configured
    raft:
      enabled: true
      setNodeId: true
      config: |
        cluster_name = "vault-integrated-storage"
        disable_mlock = true
        service_registration "kubernetes" {}

        ui = true

        storage "raft" {
          path = "/vault/data"
        }

        listener "tcp" {
          address = "[::]:8200"
          cluster_address = "[::]:8201"
          tls_disable = "false"
          tls_cert_file = "/vault/userconfig/vault-tls/tls.crt"
          tls_key_file = "/vault/userconfig/vault-tls/tls.key"
          tls_client_ca_file = "/vault/userconfig/vault-ca/vault.ca"
        }
Configuring Vault
Initialising Vault
The command below can be used to configure the vault instance with 1 key share. This is not suitable for production, but is acceptable for this testing use case.
kubectl exec -n vault vault-0 -- vault operator init -key-shares=1 -key-threshold=1 -format=json > cluster-keys.json
Accessing the UI
To make configuration more accessible, the vault service is port forwarded and binded to 0.0.0.0, which allows the Vault UI to be accessed from the host machine (as it is running within a VM).
kubectl -n vault port-forward service/vault 8200:8200 --address 0.0.0.0
Create a PKI secret
Here I created a PKI secret called pki-int. I set the mount and AIA path as the following:
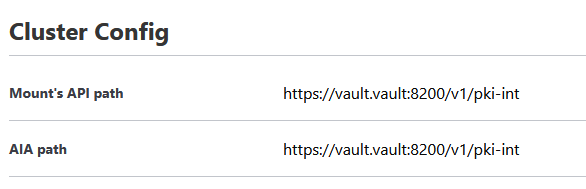
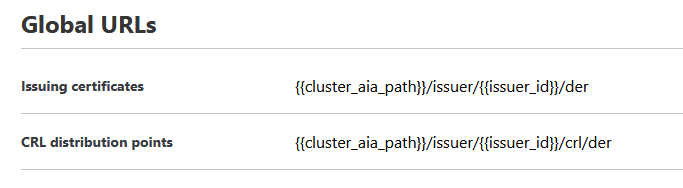
And set the global URLs as the following as well:
Sign Vault intermediate certificate
To configure certificate signing on Vault, we first need to assign Vault an intermediate certificate from our offline root CA. This certificate signing request is then utilised in the following command (the number of days matches the days specified in a previous command):
openssl x509 -req -in vault-int-signing-request.csr -CA ca-cert.pem -CAkey ca-key.pem -CAcreateserial -out vault-int-cert.pem -days 1095 -copy_extensions copyall
Bundle this intermediate cert with the root cert to create a chain of verification:
cat vault-int-cert.pem ca-cert.pem > vault-int-bundle.pem
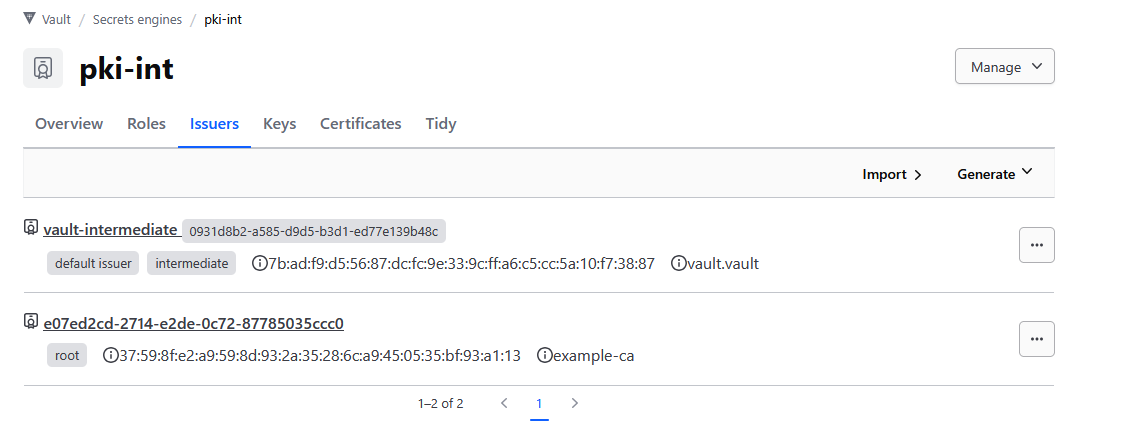
Set this bundle as the TLS certificate in Vault. This creates two issuers, one for the intermediate and another for the submitted root CA certificate (the private key is not provided for this root CA so it cannot be used to sign any certificates on Vault).
Configuring Mongodb
The MongoDB Kubernetes operator was installed to configure MongoDB databases on Kubernetes. The resource definition below was utilised to create these instances. Ideally the number of replica members should be set to 2 or more for redundancy, but due to a lack of memory/CPU, only 1 was utilised for testing purposes. certificateKeySecretRef and caCertificateSecretRef refer to a future secret created by cert-manager containing the certificates issued by Vault to MongoDB.
apiVersion: mongodbcommunity.mongodb.com/v1
kind: MongoDBCommunity
metadata:
  name: example-mongodb
spec:
  members: 1
  type: ReplicaSet
  version: "6.0.5"
  security:
    authentication:
      modes: ["SCRAM"]
    tls:
      enabled: true
      certificateKeySecretRef:
        name: tls-certificate
      caCertificateSecretRef:
        name: tls-certificate
  users:
    - name: my-user
      db: admin
      passwordSecretRef:
        name: my-user-password
      roles:
        - name: clusterAdmin
          db: admin
        - name: userAdminAnyDatabase
          db: admin
      scramCredentialsSecretName: my-scram
---
apiVersion: v1
kind: Secret
metadata:
  name: my-user-password
type: Opaque
stringData:
  password: <password here>
Creating an issuing role in Vault
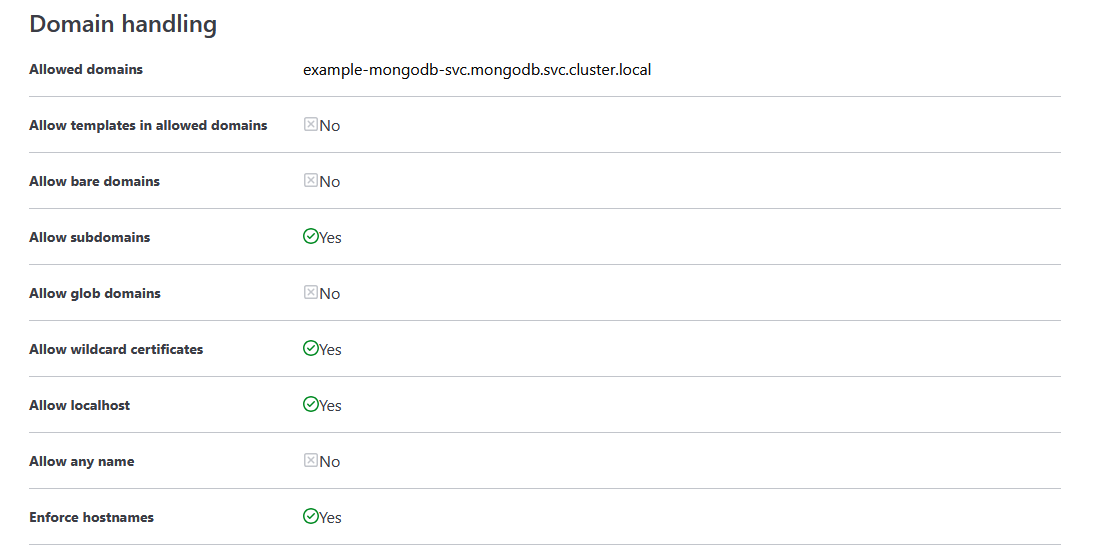
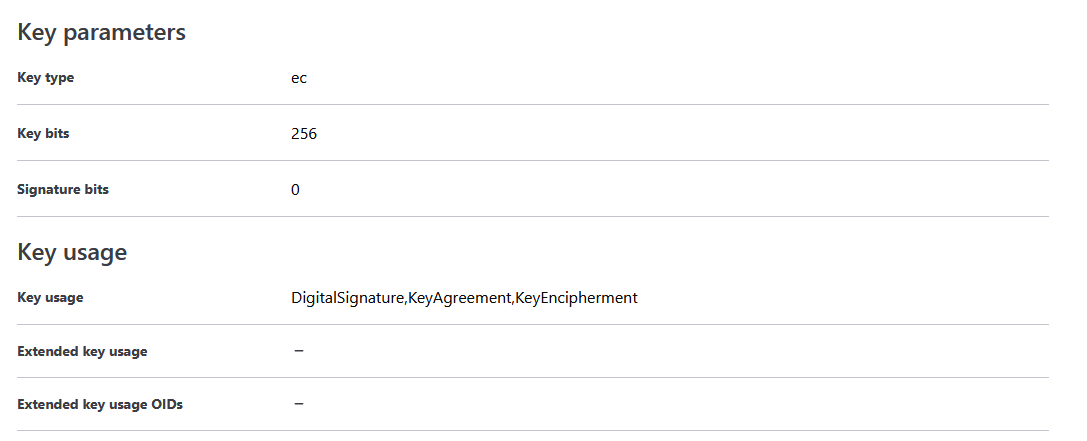
An issuing role is created on Vault which is used to issue certificates to the MongoDB service. The goal of this issuer is to issue short term certificates (31 days validity) which are then auto-renewed by cert-manager in Kubernetes. The following domain settings were configured, along with setting an elliptical curve key for a smaller key size agaisnt RSA:
Configuring authorisation policy
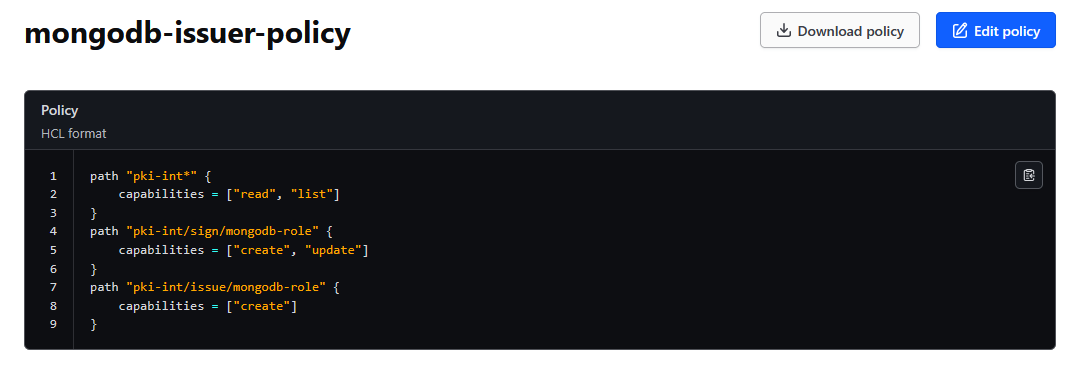
An authorisation policy is required to ensure an authenticated cert-manager service can retrive the certificate created by Vault:
Configuring authentication method
Cert-manager needs to be able to authenticate itself to Vault in order to retrieve the MongoDB certificates. This is done by running the commands below (these are performed on the command line instead of the web UI as the last command utilises an environment variable).
1
2
3
4
kubectl exec --stdin=true --tty=true vault-0 -n vault -- /bin/sh
vault login <auth token here>
vault auth enable kubernetes
vault write auth/kubernetes/config kubernetes_host="https://$KUBERNETES_PORT_443_TCP_ADDR:443"
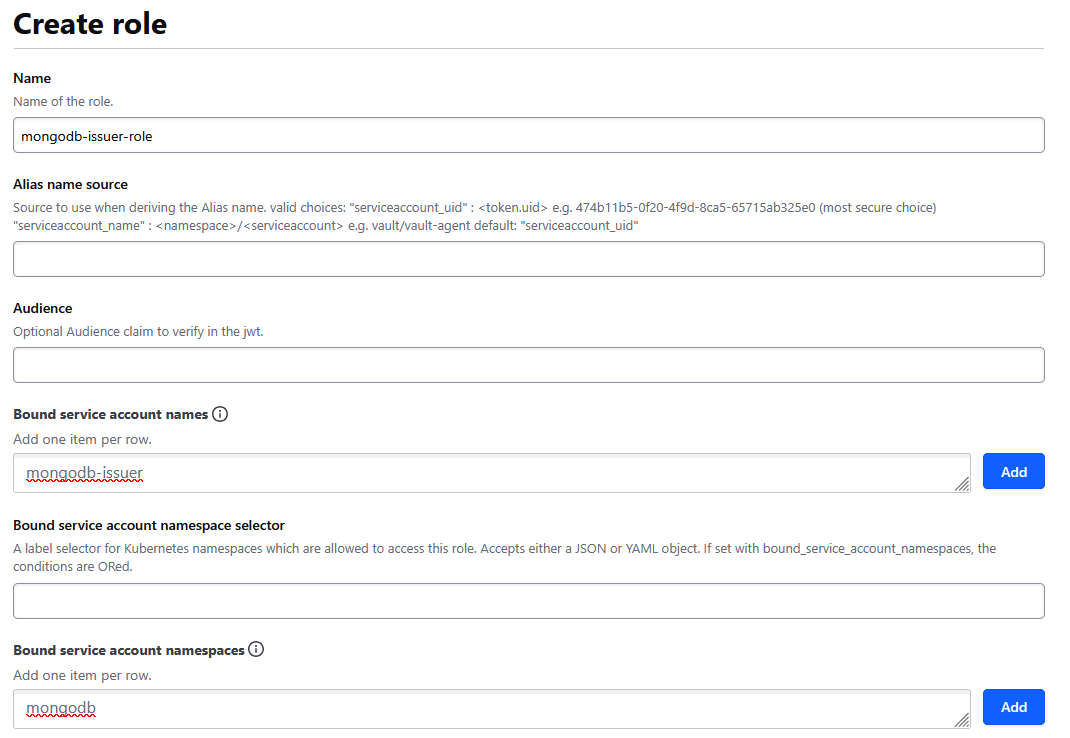
The following authentication role is then created within the Kubernetes authentication method and the token’s initial TTL is set to 10 minutes (short-lived). The policy we created above (mongodb-issuer-policy) is also assigned to this role to configure its access to least priviledge permissions:
Configure cert-manager
Cert-manager can now be installed to be configured with the role created above. This requires a service account be be created within the Kubernetes MongoDB namespace (notice that the service account name below matches the name defined above):
kubectl create serviceaccount mongodb-issuer -n mongodb
A service account token is then created for this role, which is used to authenticate to Vault:
apiVersion: v1
kind: Secret
metadata:
  name: mongodb-issuer-token
  annotations:
    kubernetes.io/service-account.name: mongodb-issuer
type: kubernetes.io/service-account-token
An issuer in cert-manager is then created which authenticates to Vault and retrieves certificates from it based on the certificate issuing role in Vault. Note that the server pointed to is https://vault.vault:8200, this refers to the vault service running within the vault namespace.
apiVersion: cert-manager.io/v1
kind: Issuer
metadata:
  name: mongodb-vault-issuer
  namespace: mongodb
spec:
  vault:
    server: https://vault.vault:8200
    path: pki-int/sign/mongodb-role
    caBundle: <insert Vault intermediate certificate bundle here as base64>
    auth:
      kubernetes:
        mountPath: /v1/auth/kubernetes
        role: mongodb-issuer-role
        secretRef:
          name: mongodb-issuer-token
          key: token
After this is created, the certificate itself is then created as a resource. This saves the CA certificate, TLS certificate and TLS key within a secret called tls-certificate (as previously mentioned)
apiVersion: cert-manager.io/v1
kind: Certificate
metadata:
  name: mongodb-tls
  namespace: mongodb
spec:
  secretName: tls-certificate
  issuerRef:
    name: mongodb-vault-issuer
  # Below needs to be specified as the requested certificate uses an EC key
  privateKey:
    algorithm: ECDSA
    size: 256
  commonName: "*.example-mongodb-svc.mongodb.svc.cluster.local"
  dnsNames:
  - "*.example-mongodb-svc.mongodb.svc.cluster.local"
The certificate can be seen being created successfully as seen below:

Confirming TLS is enabled
After the TLS certificate has been issued, the MongoDB instances need to be restarted, which can be done by running the following command:
kubectl rollout restart statefulset example-mongodb -n mongodb
Once the pods have all restarted, we can then log into the MongoDB instance using TLS:
kubectl exec -it example-mongodb-0 -c mongod -n mongodb -- bash
Then connecting to the instance (ensuring the root CA certificate is specified as trusted) results in:
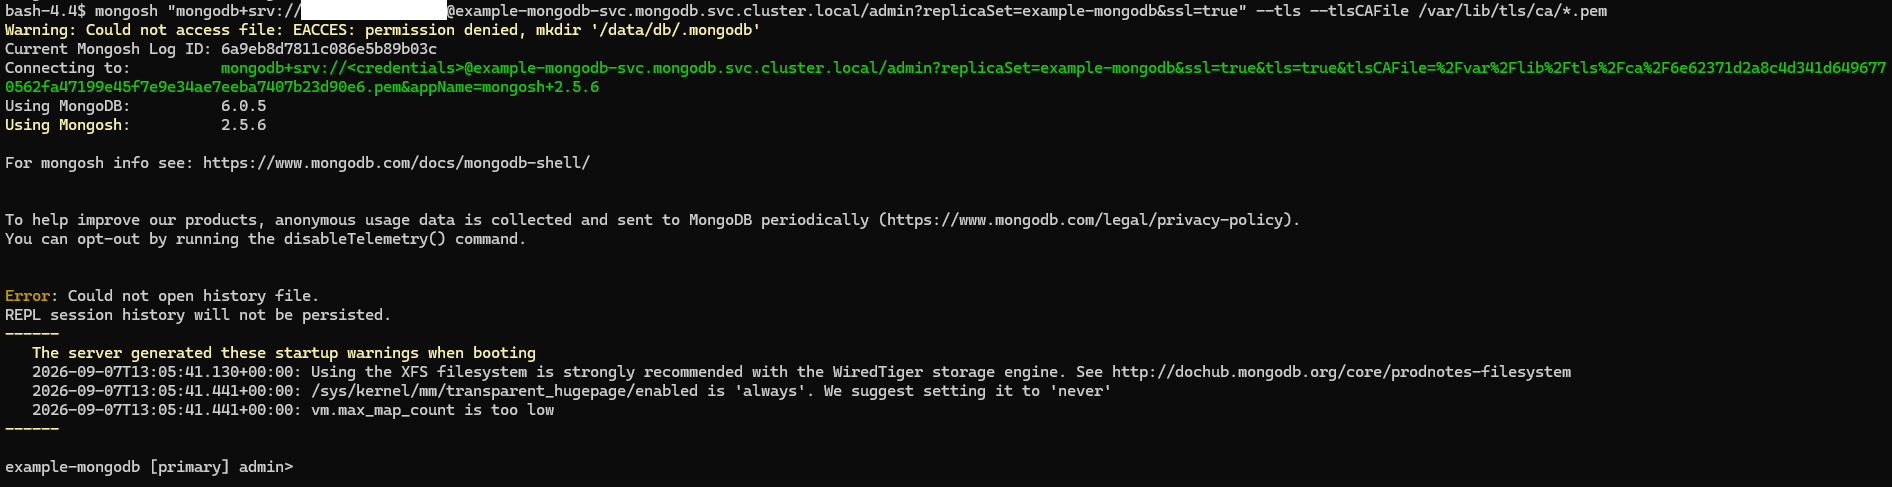
This showcases a successful connection to the MongoDB database using TLS, which was configured via certificates retrived from Vault using cert-manager.